NveEffectKit Introduction Document
This document is used to introduce how to integrate NveEffectKit. NveEffectKit integrates beauty, face shape, makeup, compose makeup, filters, and face props functions on the basis of the Meicam SDK, making it easier for users to integrate corresponding functions for texture or buffer processing, such as adding the above effects to images or adding effects to each frame (texture or buffer) in live recording.The dependency library of NveEffectKit is NvEffectSdkCore (or NvStreamingSdkCore)。 Here we take the NveEffectKitDemo, which integrates NveEffectKit, as an example to demonstrate the access steps. The NveEffectKitDemo shows adding all above function during video shooting, and NveEffectKit supports adding an these function during editing as well.
Step 1: Add Dependency Libraries
NveEffectKit.framework internally calls the interfaces of Meicam SDK, so it matches the Meicam SDK library it references in pairs; If you purchase and use NvEffectSdkCore, you will need to use NveEffectKit.framework that internally references NvEffectSdkCore. Similarly, if you purchase and use NvStreamingSdkCore, you will need to use NveEffectKit.framework that internally references NvStreamingSdkCore. You can contact our technical or business colleagues to obtain the corresponding matching library.
If you are using NvEffectSdkCore, add the library as shown in Figure 1-1 below 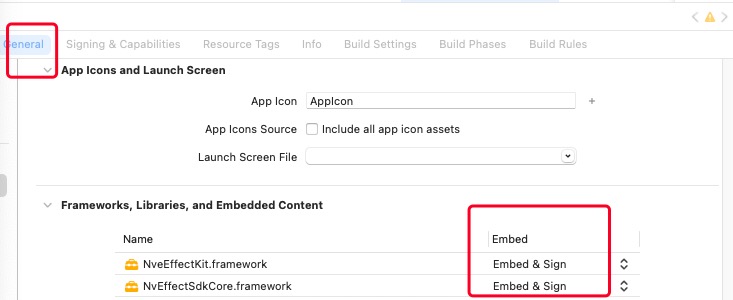
1-1If you are using NvStreamingSdkCore,add the library as shown in Figure 1-2 below 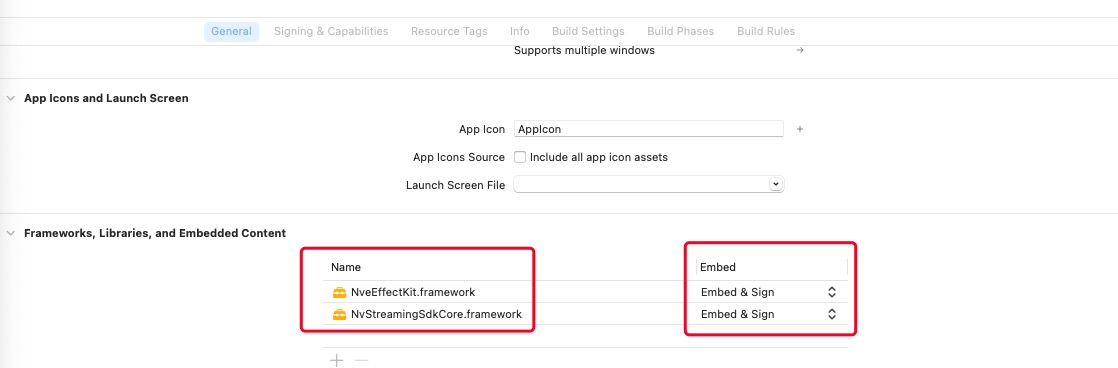
1-2Step 2: SDK Authorization
It is required to verify the authorization of Meicam sdk on your project before using any apis of Meicam, and it only needs to be verified once. It is recommended to call the interface for authorization verification in the AppDelegate file. Attension that the authorization interface must be called before NveEffectKit creates a single instance. The example code is as follows:
NSString *sdkLicFilePath = [[NSBundle mainBundle] pathForResource:@"meishesdk.lic" ofType:nil];
if (![NveEffectKit verifySdkLicenseFile:sdkLicFilePath]) {
NSLog(@"Sdk License File error");
}
Attention: the Meicam SDK authorization file is bound to your project Bundle Identifier. To modify the Bundle Identifier, you need to replace the corresponding authorization file.
Step 3: Prepare the frame data to be processed
You can choose according to your project needs, such as shooting and recording functions or single images, as long as you can obtain the texture or buffer data. For example, shooting can be done using the AVFoundation of the iOS system, or a third-party that can implement the shooting function , meanwhile you can obtain real-time data for each frame in the proxy callback.
NveEffectKitDemo implement shooting function based on AVFoundation, and obtains the each frame data from the AVCaptureVideoDataOutputSampleBufferDelegate callback.The example code is as follows:
- (void)captureOutput:(AVCaptureOutput *)output didOutputSampleBuffer:(CMSampleBufferRef)sampleBuffer fromConnection:(AVCaptureConnection *)connection {
if (self.delegate && [self.delegate respondsToSelector:@selector(captureOutput:didOutputSampleBuffer:fromConnection:isAudioConnection:)]) {
if (connection == _audioConnection) {
[self.delegate captureOutput:output didOutputSampleBuffer:sampleBuffer fromConnection:connection isAudioConnection:YES];
} else {
[self.delegate captureOutput:output didOutputSampleBuffer:sampleBuffer fromConnection:connection isAudioConnection:NO];
}
}
}
Step 4: Initialize the face detection model before using facial effects
Beauty, shape, makeup, compose makeup, and face props are related to human faces, so it is necessary to initialize the face model before using these effects, and only initialize it once. After initialization, the memory in all face models will not be increased at once. The memory will only be partly increased after the corresponding functions are actually used. This is Meicam SDK's memory optimization strategy for face models. The initialization face code is as follows:
NSString *bundlePath = [[[NSBundle bundleForClass:[self class]] bundlePath] stringByAppendingPathComponent:@"model.bundle"];
NSString *faceModel = [bundlePath stringByAppendingPathComponent:@"ms_face240_v3.0.1.model"];
BOOL ret = [NveEffectKit initHumanDetection:NveDetectionModelType_face modelPath:faceModel licenseFilePath:nil];
if (!ret) {
NSLog(@"init human detect error: face");
}
NSString *fakeFace = [bundlePath stringByAppendingPathComponent:@"fakeface_v1.0.1.dat"];
ret = [NveEffectKit initHumanDetection:NveDetectionModelType_fakeFace modelPath:fakeFace licenseFilePath:nil];
if (!ret) {
NSLog(@"init human detect error: fakeFace");
}
NSString *avatar = [bundlePath stringByAppendingPathComponent:@"ms_avatar_v2.0.0.model"];
ret = [NveEffectKit initHumanDetection:NveDetectionModelType_avatar modelPath:avatar licenseFilePath:nil];
if (!ret) {
NSLog(@"init human detect avatar: avatar");
}
NSString *eyeball = [bundlePath stringByAppendingPathComponent:@"ms_eyecontour_v2.0.0.model"];
ret = [NveEffectKit initHumanDetection:NveDetectionModelType_eyeball modelPath:eyeball licenseFilePath:nil];
if (!ret) {
NSLog(@"init human detect error: eyeball");
}
NSString *facecommon = [bundlePath stringByAppendingPathComponent:@"facecommon_v1.0.1.dat"];
ret = [NveEffectKit initHumanDetection:NveDetectionModelType_face modelPath:facecommon licenseFilePath:nil];
if (!ret) {
NSLog(@"init human detect error: facecommon");
}
NSString *background = [bundlePath stringByAppendingPathComponent:@"ms_humanseg_medium_v2.0.0.model"];
BOOL highVersion = [NvLiveEffectModule isHighVersionPhone];
if (highVersion == NO) {
background = [[[bundlePath stringByAppendingPathComponent:@"license"]stringByAppendingPathComponent:@"ms"] stringByAppendingPathComponent:@"ms_humanseg_small_v2.0.0.model"];
}
ret = [NveEffectKit initHumanDetection:NveDetectionModelType_background modelPath:background licenseFilePath:nil];
if (!ret) {
NSLog(@"init human detect error: background");
}
NSString *hand = [bundlePath stringByAppendingPathComponent:@"ms_hand_v2.0.0.model"];
ret = [NveEffectKit initHumanDetection:NveDetectionModelType_hand modelPath:hand licenseFilePath:nil];
if (!ret) {
NSLog(@"init human detect error: hand");
}
NSString *faceCommon = [bundlePath stringByAppendingPathComponent:@"facecommon_v1.0.1.dat"];
ret = [NveEffectKit initHumanDetection:NveDetectionModelType_faceCommon modelPath:faceCommon licenseFilePath:nil];
if (!ret) {
NSLog(@"init human detect error: faceCommon");
}
NSString *advancedbeauty = [bundlePath stringByAppendingPathComponent:@"advancedbeauty_v1.0.1.dat"];
ret = [NveEffectKit initHumanDetection:NveDetectionModelType_advancedBeauty modelPath:advancedbeauty licenseFilePath:nil];
if (!ret) {
NSLog(@"init human detect error: advancedbeauty");
}
The corresponding table of various detection types and purposes in the code above is as follows
| Detection model type | Name | Use |
| NveDetectionModelType_face | face | face model |
| NveDetectionModelType_hand | hand | props with gestures will be used |
| NveDetectionModelType_avatar | avatar | The avatar prop will be used |
| NveDetectionModelType_fakeFace | fakeface | use of face props |
| NveDetectionModelType_eyeball | eyeball | eyeball model |
| NveDetectionModelType_makeup2 | makeup | deprecated since version 3.13.0, please use NveDetectionModelType_faceCommon instead |
| NveDetectionModelType_background | segmentation | some face props will use segmentation effect |
| NveDetectionModelType_faceCommon | Universal face model | since version 3.13.0, when you need to use face-related functions or beauty makeup, you need to initialize |
| NveDetectionModelType_advancedBeauty | Advanced Beauty Model | since version 3.13.0, to enable advanced beauty, you need to initialize |
Attension: if the model files are missing during the development process, you can contact us to obtain it.
Step 5: Add effects data to the NveEffectKit singleton
Then we should add various types of effects data to NveEffectKit singleton, so that the effects on NveEffectKit singleton can be rendered onto the texture or buffer in the subsequent step. You need to add corresponding effect data to NveEffectKit instances in appropriate places within your project. For example, if a user of your app clicks to add a filter, you should set the corresponding filter effect data to NveEffectKit instances in the click method, and NveEffectKit instances will manage the added effect data uniformly. The following are specific explanations of different types of effects:
Beauty
NveBeauty *beauty = [[NveBeauty alloc] init];
// strength
beauty.strength = 1;
[NveEffectKit shareInstance].beauty = beauty;
Beauty can also implement functions such as switch whitening types or face smoothing types, adjust intensity, etc. You can refer to the code below (this is an extension of NveBeauty and is not included in NveEffectKit.framework, but can be obtained in the demo). This is a convenient method for implementing UI interface operations, and you can also write your own method according to your needs. The same applies to other types of effects, which will not be repeated later. Similar to setting strength, save all the data after the operation to [NveEffectKit shareInstance].beauty .
- (void)updateEffect:(NveBeautyLiveType)type value:(double)value {
switch (type) {
case NveBeautyLiveType_whitening:
self.whitening = value;
[self setEffectParam:@"Whitening Lut Enabled" type:NveParamType_bool value:@(NO)];
[self setEffectParam:@"Whitening Lut File" type:NveParamType_string value:@""];
break;
case NveBeautyLiveType_whitening_1:{
self.whitening = value;
NSString *whitenLutPath = [[[NSBundle bundleForClass:[NvLiveEffectModule class]] bundlePath] stringByAppendingPathComponent:@"whitenLut.bundle"];
NSString *lutPath = [whitenLutPath stringByAppendingPathComponent:@"WhiteB.mslut"];
[self setEffectParam:@"Whitening Lut Enabled" type:NveParamType_bool value:@(YES)];
[self setEffectParam:@"Whitening Lut File" type:NveParamType_string value:lutPath];
}
break;
case NveBeautyLiveType_reddening:
self.reddening = value;
break;
case NveBeautyLiveType_strength:
self.strength = value;
[self setEffectParam:@"Advanced Beauty Intensity" type:NveParamType_float value:@(0)];
[self setEffectParam:@"Beauty Strength" type:NveParamType_float value:@(value)];
break;
case NveBeautyLiveType_strength_1:
self.strength = value;
[self setEffectParam:@"Advanced Beauty Enable" type:NveParamType_bool value:@(YES)];
[self setEffectParam:@"Advanced Beauty Type" type:NveParamType_int value:@(0)];
[self setEffectParam:@"Beauty Strength" type:NveParamType_float value:@(0)];
[self setEffectParam:@"Advanced Beauty Intensity" type:NveParamType_float value:@(value)];
break;
case NveBeautyLiveType_strength_2:
self.strength = value;
[self setEffectParam:@"Advanced Beauty Enable" type:NveParamType_bool value:@(YES)];
[self setEffectParam:@"Advanced Beauty Type" type:NveParamType_int value:@(1)];
[self setEffectParam:@"Beauty Strength" type:NveParamType_float value:@(0)];
[self setEffectParam:@"Advanced Beauty Intensity" type:NveParamType_float value:@(value)];
break;
case NveBeautyLiveType_strength_3:
self.strength = value;
[self setEffectParam:@"Advanced Beauty Enable" type:NveParamType_bool value:@(YES)];
[self setEffectParam:@"Advanced Beauty Type" type:NveParamType_int value:@(2)];
[self setEffectParam:@"Beauty Strength" type:NveParamType_float value:@(0)];
[self setEffectParam:@"Advanced Beauty Intensity" type:NveParamType_float value:@(value)];
break;
case NveBeautyLiveType_matte:
self.matte = value;
break;
case NveBeautyLiveType_sharpen:
self.sharpen = value;
break;
case NveBeautyLiveType_definition:
self.definition = value;
break;
}
}
Shape
NveShape *shape = [[NveShape alloc] init];
// face width
shape.faceWidth = 1;
[NveEffectKit shareInstance].shape = beauty;
In addition to the face width effect, there are many other face type effects that can be seen in the code. They will not be listed here, but can be viewed in the comments. One thing to note here is that beauty shapes are all package type materials, and each type of beauty shape effect can have multiple different package files to achieve different algorithm effects (for example, the big eye effect can have multiple big eye effect material packages implemented by different algorithms). Therefore, it is necessary to set the material UUID to the specified effect after successful installation. The implementation logic of material installation can be viewed in the following section. The following code can be added to the extension methods of the NveShape class (this is an extension method of the NveShape class that is not in the NveEffectKit.framework, but can be obtained in the demo), so that it can be called in the appropriate place and the relevant data can be saved to the [NveEffectKit shareInstance].shape.
- (void)updateEffect:(NveShapeLiveType)type packageId:(NSString *)packageId {
if (!packageId) {
return;
}
switch (type) {
case NveShapeLiveType_faceWidth:
self.faceWidthPackageId = packageId;
break;
case NveShapeLiveType_faceLength:
self.faceLengthPackageId = packageId;
break;
case NveShapeLiveType_faceSize:
self.faceSizePackageId = packageId;
break;
case NveShapeLiveType_foreheadHeight:
self.foreheadHeightPackageId = packageId;
break;
case NveShapeLiveType_chinLength:
self.chinLengthPackageId = packageId;
break;
case NveShapeLiveType_eyeSize:
self.eyeSizePackageId = packageId;
break;
case NveShapeLiveType_eyeCornerStretch:
self.eyeCornerStretchPackageId = packageId;
break;
case NveShapeLiveType_noseWidth:
self.noseWidthPackageId = packageId;
break;
case NveShapeLiveType_noseLength:
self.noseLengthPackageId = packageId;
break;
case NveShapeLiveType_mouthSize:
self.mouthSizePackageId = packageId;
break;
case NveShapeLiveType_mouthCornerLift:
self.mouthCornerLiftPackageId = packageId;
break;
}
}
Set the each property value of shape code as follows
- (void)updateEffect:(NveShapeLiveType)type value:(double)value {
switch (type) {
case NveShapeLiveType_faceWidth:
self.faceWidth = value;
break;
case NveShapeLiveType_faceLength:
self.faceLength = value;
break;
case NveShapeLiveType_faceSize:
self.faceSize = value;
break;
case NveShapeLiveType_foreheadHeight:
self.foreheadHeight = value;
break;
case NveShapeLiveType_chinLength:
self.chinLength = value;
break;
case NveShapeLiveType_eyeSize:
self.eyeSize = value;
break;
case NveShapeLiveType_eyeCornerStretch:
self.eyeCornerStretch = value;
break;
case NveShapeLiveType_noseWidth:
self.noseWidth = value;
break;
case NveShapeLiveType_noseLength:
self.noseLength = value;
break;
case NveShapeLiveType_mouthSize:
self.mouthSize = value;
break;
case NveShapeLiveType_mouthCornerLift:
self.mouthCornerLift = value;
break;
}
}
Micro Shape
Micro shape is quite unique, as it includes both materials that require installation and built-in materials, but the implementation logic follows the same design principles as other effect types we introduced
NveMicroShape *microShape = [[NveMicroShape alloc] init];
// head size
microShape.headSize = 1;
[NveEffectKit shareInstance].microShape = microShape;
Set the package material uuid to [NveEffectKit shareInstance].microShape(this is an extension class method ofNveMicroShapethat is not inNveEffectKit.frameworkand can be obtained in the demo). The code is as follows
- (void)updateEffect:(NveMicroShapeLiveType)type packageId:(NSString *)packageId {
switch (type) {
case NveMicroShapeLiveType_headSize:
self.headSizePackageId = packageId;
break;
case NveMicroShapeLiveType_malarWidth:
self.malarWidthPackageId = packageId;
break;
case NveMicroShapeLiveType_jawWidth:
self.jawWidthPackageId = packageId;
break;
case NveMicroShapeLiveType_templeWidth:
self.templeWidthPackageId = packageId;
break;
case NveMicroShapeLiveType_removeNasolabialFolds:
case NveMicroShapeLiveType_removeDarkCircles:
case NveMicroShapeLiveType_brightenEyes:
case NveMicroShapeLiveType_whitenTeeth:
// Unsupport custom effect packs
break;
case NveMicroShapeLiveType_eyeDistance:
self.eyeDistancePackageId = packageId;
break;
case NveMicroShapeLiveType_eyeAngle:
self.eyeAnglePackageId = packageId;
break;
case NveMicroShapeLiveType_philtrumLength:
self.philtrumLengthPackageId = packageId;
break;
case NveMicroShapeLiveType_noseBridgeWidth:
self.noseBridgeWidthPackageId = packageId;
break;
case NveMicroShapeLiveType_noseHeadWidth:
self.noseHeadWidthPackageId = packageId;
break;
case NveMicroShapeLiveType_eyebrowThickness:
self.eyebrowThicknessPackageId = packageId;
break;
case NveMicroShapeLiveType_eyebrowAngle:
self.eyebrowAnglePackageId = packageId;
break;
case NveMicroShapeLiveType_eyebrowXOffset:
self.eyebrowXOffsetPackageId = packageId;
break;
case NveMicroShapeLiveType_eyebrowYOffset:
self.eyebrowYOffsetPackageId = packageId;
break;
case NveMicroShapeLiveType_eyeWidth:
self.eyeWidthPackageId = packageId;
break;
case NveMicroShapeLiveType_eyeHeight:
self.eyeHeightPackageId = packageId;
break;
case NveMicroShapeLiveType_eyeArc:
self.eyeArcPackageId = packageId;
break;
case NveMicroShapeLiveType_eyeYOffset:
self.eyeYOffsetPackageId = packageId;
break;
}
}
Set the each property value of micro shape code as follows
- (void)updateEffect:(NveMicroShapeLiveType)type value:(double)value {
switch (type) {
case NveMicroShapeLiveType_headSize:
self.headSize = value;
break;
case NveMicroShapeLiveType_malarWidth:
self.malarWidth = value;
break;
case NveMicroShapeLiveType_jawWidth:
self.jawWidth = value;
break;
case NveMicroShapeLiveType_templeWidth:
self.templeWidth = value;
break;
case NveMicroShapeLiveType_removeNasolabialFolds:
self.removeNasolabialFolds = value;
break;
case NveMicroShapeLiveType_removeDarkCircles:
self.removeDarkCircles = value;
break;
case NveMicroShapeLiveType_brightenEyes:
self.brightenEyes = value;
break;
case NveMicroShapeLiveType_whitenTeeth:
self.whitenTeeth = value;
break;
case NveMicroShapeLiveType_eyeDistance:
self.eyeDistance = value;
break;
case NveMicroShapeLiveType_eyeAngle:
self.eyeAngle = value;
break;
case NveMicroShapeLiveType_philtrumLength:
self.philtrumLength = value;
break;
case NveMicroShapeLiveType_noseBridgeWidth:
self.noseBridgeWidth = value;
break;
case NveMicroShapeLiveType_noseHeadWidth:
self.noseHeadWidth = value;
break;
case NveMicroShapeLiveType_eyebrowThickness:
self.eyebrowThickness = value;
break;
case NveMicroShapeLiveType_eyebrowAngle:
self.eyebrowAngle = value;
break;
case NveMicroShapeLiveType_eyebrowXOffset:
self.eyebrowXOffset = value;
break;
case NveMicroShapeLiveType_eyebrowYOffset:
self.eyebrowYOffset = value;
break;
case NveMicroShapeLiveType_eyeWidth:
self.eyeWidth = value;
break;
case NveMicroShapeLiveType_eyeHeight:
self.eyeHeight = value;
break;
case NveMicroShapeLiveType_eyeArc:
self.eyeArc = value;
break;
case NveMicroShapeLiveType_eyeYOffset:
self.eyeYOffset = value;
break;
}
}
Now, all data related to micro shape has been set to [NveEffectKit shareInstance].microShape
Makeup
Makeup material refer to file with a file extension of .makeup, which is individual makeup file that also require the installation of material package file and the specification of packegeId (uuid).
NveMakeup *makeup = [NveEffectKit shareInstance].makeup;
if (!makeup) {
makeup = [[NveMakeup alloc] init];
[NveEffectKit shareInstance].makeup = makeup;
}
[makeup updateEffect:effectModel.effectType packageId:effectModel.uuid];
[makeup updateEffect:effectModel.effectType value:effectModel.value];
The two methods called are extension class methods of NveMakeup, which are not in NveEffectKit.framework, but can be obtained in the demo.
- (void)updateEffect:(NveMakeupLiveType)type packageId:(NSString *)packageId {
switch (type) {
case NveMakeupLiveType_lip:
self.lipPackageId = packageId;
break;
case NveMakeupLiveType_eyeshadow:
self.eyeshadowPackageId = packageId;
break;
case NveMakeupLiveType_eyebrow:
self.eyebrowPackageId = packageId;
break;
case NveMakeupLiveType_eyelash:
self.eyelashPackageId = packageId;
break;
case NveMakeupLiveType_eyeliner:
self.eyelinerPackageId = packageId;
break;
case NveMakeupLiveType_blusher:
self.blusherPackageId = packageId;
break;
case NveMakeupLiveType_brighten:
self.brightenPackageId = packageId;
break;
case NveMakeupLiveType_shadow:
self.shadowPackageId = packageId;
break;
case NveMakeupLiveType_eyeball:
self.eyeballPackageId = packageId;
break;
}
}
- (void)updateEffect:(NveMakeupLiveType)type value:(double)value {
switch (type) {
case NveMakeupLiveType_lip:
self.lip = value;
break;
case NveMakeupLiveType_eyeshadow:
self.eyeshadow = value;
break;
case NveMakeupLiveType_eyebrow:
self.eyebrow = value;
break;
case NveMakeupLiveType_eyelash:
self.eyelash = value;
break;
case NveMakeupLiveType_eyeliner:
self.eyeliner = value;
break;
case NveMakeupLiveType_blusher:
self.blusher = value;
break;
case NveMakeupLiveType_brighten:
self.brighten = value;
break;
case NveMakeupLiveType_shadow:
self.shadow = value;
break;
case NveMakeupLiveType_eyeball:
self.eyeball = value;
break;
}
}
You can also set the color such as lip color, the code is as follows
- (void)updateEffect:(NveMakeupLiveType)type color:(UIColor *)color {
switch (type) {
case NveMakeupLiveType_lip:
self.lipColor = color;
break;
case NveMakeupLiveType_eyeshadow:
self.eyeshadowColor = color;
break;
case NveMakeupLiveType_eyebrow:
self.eyebrowColor = color;
break;
case NveMakeupLiveType_eyelash:
self.eyelashColor = color;
break;
case NveMakeupLiveType_eyeliner:
self.eyelinerColor = color;
break;
case NveMakeupLiveType_blusher:
self.blusherColor = color;
break;
case NveMakeupLiveType_brighten:
self.brightenColor = color;
break;
case NveMakeupLiveType_shadow:
self.shadowColor = color;
break;
case NveMakeupLiveType_eyeball:
self.eyeballColor = color;
break;
}
}
Similarly, it is necessary to save makeup related data to [NveEffectKit shareInstance].makeup.
Compose makeup
Compose makeup is a folder that organizes various types of effects, such as beauty, shape, micro shape, etc. The attribute values of each effect are specified in a JSON file according to specified rules (such as intensity value, eye size, lip color, etc.), and then the overall effect is uniformly used. When applying or removing the compose makeup, the beauty, shape, micro shape, and makeup data will be updated. Simply input the path of the corresponding compose makeup decompression folder for the compose makeup api.The example code is as follows
// packagePath
NveComposeMakeup *composeMakeup = [NveComposeMakeup composeMakeupWithPackagePath:packagePath];
[NveEffectKit shareInstance].composeMakeup = composeMakeup;
Filter
NvFilter *filter = [NvFilter filterWithEffectId:packageId];
// intensity
filter.intensity = 0.5;
NvFilterContainer *filterContainer = [NveEffectKit shareInstance].filterContainer;
// add filter
[filterContainer append:filter];
// remove filter
[filterContainer remove:filter];
Built-in filter list:https://www.meishesdk.com/ios/doc_ch/html/content/FxNameList_8md.html Or use a filter package, such as:0FBCC8A1-C16E-4FEB-BBDE-D04B91D98A40.1.videofx The filter package needs to be installed to obtain the packageId, which is the uuid of this filter package.
Face Prop
After installing the face prop material, obtain the packageId, and then create an NveFaceProp object based on the packageId. Set the NveFaceProp object to the [NveEffectKit shareInstance].prop, so that the data of the prop is recorded in the [NveEffectKit shareInstance].prop.
NveFaceProp *prop = [NveFaceProp propWithPackageId:packageId];
[NveEffectKit shareInstance].prop = prop;
Now, from beauty to face props, the data for each effect is saved in the [NveEffectKit shareInstance]instance. You can start preparing the frame data to be rendered and the configuration work before rendering.
Step 6:Set render input data to [NveEffectKit shareInstance] – NveRenderInput
NveRenderInput is the input data for the [NveEffectKit shareInstance] singleton, which includes the frame data (texture or buffer) to be processed, as well as the input and output configurations, such as the selection of input texture output texture mode, input buffer output buffer mode, or input buffer output texture mode. The definition of data structure is as follows
@interface NveRenderInput : NSObject
@property(nonatomic, strong) NveTexture *_Nullable texture; //!< \if ENGLISH Texture \else 输入的纹理 \endif
/*! \if ENGLISH Input pixelBuffer
\else 输入的pixelBuffer
\endif
*/
@property(nonatomic, strong) NveImageBuffer *_Nullable imageBuffer;
@property(nonatomic, strong) NveRenderConfig *config; //!< \if ENGLISH I/o configuration \else 输入输出配置 \endif
@end
@interface NveRenderConfig : NSObject
/// render mode(input format and output format)
/// 渲染模式
@property(nonatomic, assign) NveRenderMode renderMode;
/// output texture layout
/// 输出纹理方向
@property(nonatomic, assign) NveTextureLayout outputTextureLayout;
// output buffer format
/// 输出Buffer格式, .none: 不指定,和输入保持一致
@property(nonatomic, assign) NvePixelFormatType outputFormatType;
/// output buffer is same buffer with input buffer object or not
/// 输出到输入Buffer
@property(nonatomic, assign) BOOL overlayInputBuffer;
// bool property indicate is the font camera or not, default is NO
// 当前图像是否来源于前置摄像头,默认为 NO
@property(nonatomic, assign) BOOL isFromFrontCamera;
@property(nonatomic, assign) BOOL autoMotion;
@end
typedef NS_ENUM(NSInteger, NveRenderMode) {
NveRenderMode_texture_texture,
NveRenderMode_buffer_texture,
NveRenderMode_buffer_buffer
};
The configuration of input and output modes can refer to the following table
| NveRenderMode_texture_texture | input texture output texture | input texture cannot be nil |
| NveRenderMode_buffer_texture | input CVPixelBufferRef,output texture | input imageBuffer cannot be nil |
| NveRenderMode_buffer_buffer | input CVPixelBufferRef,output CVPixelBufferRef | input imageBuffer cannot be nil |
According to the selected input/output render mode, pass the obtained frame data (such as data obtained from the AVFoundation shooting callback method) to the corresponding attribute in NveRenderInput in an appropriate form, taking NveRenderMode_buffer_buffer as an example
- (void)captureOutput:(AVCaptureOutput *)output didOutputSampleBuffer:(CMSampleBufferRef)sampleBuffer fromConnection:(AVCaptureConnection *)connection isAudioConnection:(BOOL)isAudioConnection {
//Code unrelated to the explanation here is ignored, and all code can be viewed in the demo
if (isAudioConnection) {
[self.fileWriter appendAudioSampleBuffer:sampleBuffer];
} else {
EAGLContext *currentContext = [EAGLContext currentContext];
if (currentContext != self.glContext) {
[EAGLContext setCurrentContext:self.glContext];
}
// Render
CVPixelBufferRef pixelBuffer = CMSampleBufferGetImageBuffer(sampleBuffer);
if (pixelBuffer == nil) {
return;
}
NveRenderInput *input = [[NveRenderInput alloc] init];
// put input data
NveImageBuffer *imageBuffer = [[NveImageBuffer alloc] init];
imageBuffer.pixelBuffer = pixelBuffer;
input.imageBuffer = imageBuffer;
input.imageBuffer.mirror = self.capture.position == AVCaptureDevicePositionFront;
// render mode
input.config.renderMode = self.renderMode;
//Code unrelated to the explanation here is ignored, and all code can be viewed in the demo
}
//Code unrelated to the explanation here is ignored, and all code can be viewed in the demo
}
Step 7: Rendering
After the previous steps have been executed, the [NveEffectKit shareInstance] singleton now has all the data for the effects that need to be rendered. The NveRenderInput also contains the input frame data and input/output configuration methods. What needs to be done now is to pass the NveRenderInput to [NveEffectKit shareInstance] singleton to render the known effects on the frame and obtain the rendered output NveRenderOutput. The code is as follows:
- (void)captureOutput:(AVCaptureOutput *)output didOutputSampleBuffer:(CMSampleBufferRef)sampleBuffer fromConnection:(AVCaptureConnection *)connection isAudioConnection:(BOOL)isAudioConnection {
//Code unrelated to the explanation here is ignored, and all code can be viewed in the demo
// Render / 渲染
NveRenderOutput *output = [[NveEffectKit shareInstance] renderEffect:input];
if (output.errorCode != NveRenderError_noError) {
[self.effectKit recycleOutput:output];
return;
}
//Code unrelated to the explanation here is ignored, and all code can be viewed in the demo
}
the output data structure is
@interface NveRenderOutput : NSObject
@property(nonatomic, assign) NveRenderError errorCode;
@property(nonatomic, strong) NveTexture *texture;
@property(nonatomic, assign) CVPixelBufferRef _Nullable pixelBuffer;
@end
Based on whether there are any issues with the rendered output, decide to discard it or display it on your screen and save it to a file (recording). It should satisfy your need. The following is the example code in the demo, which you can understand as pseudocode.
// Display
// 显示
CMTime presentationTimeStamp = CMSampleBufferGetPresentationTimeStamp(sampleBuffer);
CMTime duration = CMSampleBufferGetDuration(sampleBuffer);
[self.preview displayRenderOutput:output presentationTimeStamp:presentationTimeStamp duration:duration];
// write into file
// 写入到文件中
CMTime bufferTime = CMSampleBufferGetPresentationTimeStamp(sampleBuffer);
int64_t timelinePos = (int64_t)(bufferTime.value / 1000);
if (output.pixelBuffer != nil) {
[self.fileWriter appendPixelBuffer:output.pixelBuffer timelinePos:timelinePos];
} else {
[self.fileWriter appendTexture:output.texture.textureId videoSize:output.texture.size timelinePos:timelinePos];
}
After processing the output data (such as displaying or saving), it is necessary to destroy the output that is no longer used and recycle the CVPixelBufferRef or texture created by NveEffectKit. The code is as follows
- (void)captureOutput:(AVCaptureOutput *)output didOutputSampleBuffer:(CMSampleBufferRef)sampleBuffer fromConnection:(AVCaptureConnection *)connection isAudioConnection:(BOOL)isAudioConnection {
//Code unrelated to the explanation here is ignored, and all code can be viewed in the demo
// release output memory / 回收释放资源
[self.effectKit recycleOutput:output];
}
Effects package material installation
All material packages (effect file) that exist in file form need to be installed before use. The code is as follows:
NSString* packagePath = @"XXXX"; // package file path
NSString* packageLicPath = @"XXXX"; // path of the corresponding lic file for the effect package file
NSMutableString *mutString = [NSMutableString string];
NvsAssetPackageManagerError error =
[[NveEffectKit shareInstance] installAssetPackage:packagePath
license:packageLicPath
type:NvsAssetPackageType_VideoFx
assetPackageId:mutString];
if (error == NvsAssetPackageManagerError_NoError) {
model.packageId = mutString;
} else {
NSLog(@"installAssetPackage error: %d", error);
}
Please note that each material (effect package) file has a corresponding authorization file(lic file), and be sure to provide the authorization file path for that material. type is the type corresponding to the material, and specific enumeration can be found in NvsAssetPackageType.
At this point, we believe you have successfully integrated. Below is a rough description of the demo files to help you quickly understand the demo architecture.
Overview of files and classes in the demo

| folder | |
| Resources | Resources (face models, effect packs, SDK licenses, etc.) |
| Makeup | Beauty and makeup views and models |
| BeautyView | Beauty, shape, microplastic views and models |
| Category | Class extension |
| Utils | Utility class |
| Helper | capture, preview, recording function class |
| Capture | Camera page controller |
| AppDelegate | App delegate |
| Class | Func |
| EFCapture | Camera management |
| NvDisplayView | Preview view |
| EFFileWriter | Video file recording |