- 1 Overview
- 1.1 Formats 1.1 Supported Formats Formats "Supported Formats"
- 1.2 Precautions
- 1.2.1 Limitations
- 1.2.2 environment 1.2.2 Running environment environment "Running environment"
- 1.2.3 Important tips
- 2 Quick start
- 2.1 Import library
- 3 for usage 3 Instructions for usage for usage "Instructions for usage"
- 3.1 Recording
- 3.1.1 from the CaptureDeviceCallback interface 3.1.1 Derived from the CaptureDeviceCallback interface from the CaptureDeviceCallback interface "Derived from the CaptureDeviceCallback interface"
- 3.1.2 class of NvsStreamingContext 3.1.2 The class of NvsStreamingContext class of NvsStreamingContext "The class of NvsStreamingContext"
- 3.1.3 class of NvsStreamingContext 3.1.2 The class of NvsStreamingContext preview class of NvsLiveWindow "The preview class of NvsLiveWindow"
- 3.1.4 before previewing 3.1.4 Preparation before previewing before previewing "Preparation before previewing"
- 3.1.5 preview 3.1.5 Starting preview preview "Starting preview"
- 3.1.5.1 3.1 Recording With beauty and without beauty "Recording With beauty and without beauty"
- 3.1.6 3.1 Recording and stop recording "Recording and stop recording"
- 3.1.7 3.1 Recording parameter adjustment "Recording parameter adjustment"
- 3.1.8 Beauty
- 3.1.9 effects with recording 3.1.9 Special effects with recording effects with recording "Special effects with recording"
- 3.1.9.1 effects for recording 3.1.9.1 Built-in effects for recording effects for recording "Built-in effects for recording"
- 3.1.9.2 package effects for recording 3.1.9.2 Extended package effects for recording package effects for recording "Extended package effects for recording"
- 3.2 Editing
- 3.2.1 the timeline and set the video resolution 3.2.1 Create the timeline and set the video resolution the timeline and set the video resolution "Create the timeline and set the video resolution"
- 3.2.2 editing for the multi-segment video and image 3.2.2 Hybrid editing for the multi-segment video and image editing for the multi-segment video and image "Hybrid editing for the multi-segment video and image"
- 3.2.3 and seeking 3.2.3 Playback and seeking and seeking "Playback and seeking"
- 3.2.4 triming 3.2.4 Video triming triming "Video triming"
- 3.2.5 the clip on the track 3.2.5 Remove the clip on the track the clip on the track "Remove the clip on the track"
- 3.2.6 of the video clip 3.2.6 Sorting of the video clip of the video clip "Sorting of the video clip"
- 3.2.7 the duration for image 3.2.7 Define the duration for image the duration for image "Define the duration for image"
- 3.2.8 the clip on the track 3.2.5 Remove the clip on the track the timeline and track "Remove the timeline and track"
- 3.3 implementation 3.3 Audio implementation implementation "Audio implementation"
- 3.3.1 Add music "Add music"
- 3.3.2 triming 3.3.2 Music triming triming "Music triming"
- 3.4 Caption
- 3.4.1 Add and remove caption "Add and remove caption"
- 3.4.2 the caption from timeline 3.4.2 Get the caption from timeline the caption from timeline "Get the caption from timeline"
- 3.4.3 properties of caption 3.4.3 Modify properties of caption properties of caption "Modify properties of caption"
- 3.4.4 properties of caption 3.4.3 Modify properties of caption the in and out point of caption "Modify the in and out point of caption"
- 3.5 sticker 3.5 Animated sticker sticker "Animated sticker"
- 3.5.1 Add and remove animated sticker "Add and remove animated sticker"
- 3.5.2 the caption from timeline 3.4.2 Get the caption from timeline the animated stickers from timeline "Get the animated stickers from timeline"
- 3.5.3 properties of caption 3.4.3 Modify properties of caption the properties of animated sticker "Modify the properties of animated sticker"
- 3.5.4 properties of caption 3.4.3 Modify properties of caption the in and out point of the animated sticker "Modify the in and out point of the animated sticker"
- 3.5.1 Add and remove animated sticker "Add and remove animated sticker"
- 3.6 Theme
- 3.6.1 Add and remove theme "Add and remove theme"
- 3.6.2 the caption from timeline 3.4.2 Get the caption from timeline theme from the timeline "Get theme from the timeline"
- 3.6.3 properties of caption 3.4.3 Modify properties of caption properties of a theme "Modify properties of a theme"
- 3.7 Transition
- 3.8 effects with recording 3.1.9 Special effects with recording effects "Special effects"
- 3.8.1 triming 3.2.4 Video triming effects "Video effects"
- 3.8.2 implementation 3.3 Audio implementation effects "Audio effects"
- 3.8.3 Timeline video effects "Timeline video effects"
- 3.8.3.1 Add and remove the effects of timeline "Add and remove the effects of timeline"
- 3.8.3.2 the caption from timeline 3.4.2 Get the caption from timeline the effects of timeline "Get the effects of timeline"
- 3.8.3.3 properties of caption 3.4.3 Modify properties of caption the in and out point of the effect for timeline "Modify the in and out point of the effect for timeline"
- 3.9 Compiling
- 3.10 package management 3.10 Asset package management package management "Asset package management"
- 3.11 Callback
- 3.1 Recording
- 4 Appendix
Details
1 Overview
Meishe SDK is dedicated to solve the technical threshold of mobile video development. It helps users quickly including the programmers which have only andriod interface development experience to develop the video recording and editing functions with excellent performance and rich rendering effects. Meishe SDK provides the following functionalities:
- No limitation for recording and editing
- The best beauty effect at highest standard
- Realtime preview of triming and changing speed without transcoding
- Hybrid editing for the video and image
- Compiling video at different resolution up to 1080p
- Rich transitions, filters, caption styles
- Self-defined video theme
- Support 4K video editing and compilation on the timeline
- Opened custom sticker feature
Formats 1.1 Supported Formats
- Input format:
- Video format: MP4,MOV,WMV,M2V,MPG
- Audio format: MP3,FLAC,AAC,M4A
- Image format: JPG,PNG
- Video encoding: H264,WMV,MPEG4
- Audio encoding: MP3,AAC,PCM,FLAC
- Output format:
- Video format: MP4,MOV
- Video encoding: H264
- Audio coding: AAC
- Extended asset package (the expansion asset package holds all type of contents, including theme, caption style, filter, sticker, etc.):
- Theme: .theme
- Caption: .captionstyle
- Filter: .videofx
- Sticker: .animatedsticker
- Transition: .videotransition
- Face prop:.arscene
1.2 Precautions
1.2.1 Limitations
All MeiShe SDK APIs should be called within UI thread, otherwise unforeseen errors may occur in application. Only exception is the getFrameAtTime() from the class of NvsVideoFrameRetriever.
environment 1.2.2 Running environment
The operating environment is as follows: android studio (required), android4.4 or later.
1.2.3 Important hint
Currently, Meishe SDK Android version supports armeabi-v7a and arm64 instruction set packages.
Add in the gradle command line when using
defaultConfig {
ndk {
abiFilters "armeabi-v7a",”arm64-v8a”
}
}
Finally, how to check if the program contains the .so package? The easiest way is to use a decompression tool to modify the apk suffix to .zip, and then check whether the libs folder contains the .so package.
2 Quick access
2.1 Import library file
If there is no Meishe SDK library, please download the latest SDK access version from Meishe official website: https://www.meishesdk.com/downloads. There are two ways to import library files:
Method 1: copy directly.
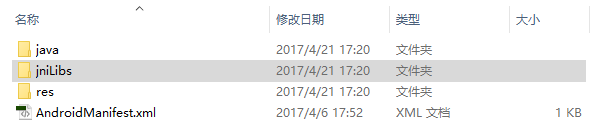
After creating the project, copy the jar package in the NvStreamingSdk_Android_***_***\lib\android_jar path to the libs path of the project. At the same time, create two folders, armeabi-v7 and arm64-v8a, under the jniLibs folder of the project (create a folder with the same name if not).Copy all the .so files in NvStreamingSdk_Android_***_***\lib\android_armv7 to the armeabi-v7a folder created earlier, and similarly copy the contents of the android_arm64 folder to the arm64-v8a folder.
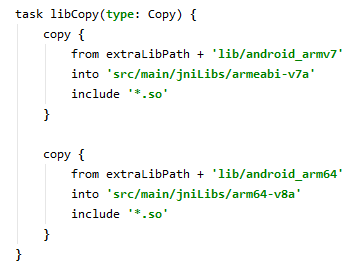
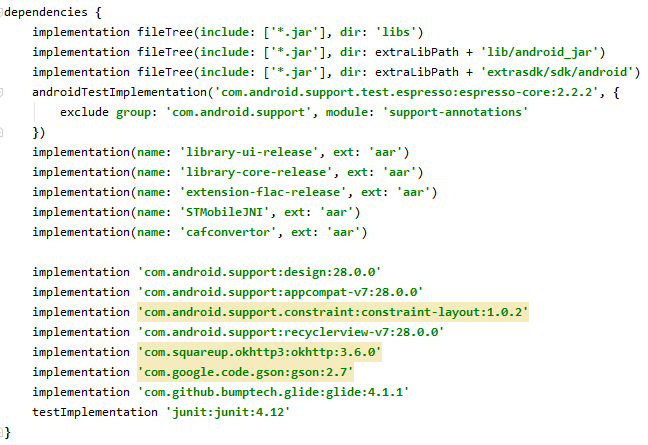
Method 2: Import the library by configuring the gradle command line.
The samples of Meishe SDK import library files through configuration command line.
for usage 3 Instructions for usage
3.1 Recording
For recording, the API applied is in the NvsStreamingContext class,including startCapturePreview() which start capturing preview, startRecording() which start recording, and appendBuiltinCaptureVideoFx() which applies Special effects the video capture. Remark: all classes in Meishe SDK starts with "Nvs".
Please pay attention to the following two points when recording video:
- Breakpoint recording: The way the Meishe SDK implements breakpoint recording is achieved by a loop call to start recording (startRecording()) and stop recording (stopRecording()). The disadvantage is that the recording produces multiple files, and the user needs to maintain and delete the video data himself. And you need to generate a complete new file from the files which were recorded by the breakpoint through subsequent editing operations. The advantage is that various transition effects can be added between independent files, which avoids the hard switching of the video picture caused by the conversion scene.
- Recording with effects and without effects: With effect recording which is the effect of the recorded file is the effect of the preview. Recording without effect is to use a filter or to record a 1:1 video when previewing, but the recorded file is the original 16:9 or 9:16 video without a filter. When editing the video files, users need to add the filter and trim them to 1:1. After editing and compiling,The video you get will be exactly the same as the preview video.
If you want to see the specific function implementation of video recording, it is recommended to refer to the video capture module of SdkDemo. Note: Only the .mov and .mp4 files are supported for video recording and video compiling.
from the CaptureDeviceCallback interface 3.1.1 Derived from the CaptureDeviceCallback interface
Before recording, the recorded Activity needs to implement the CaptureDeviceCallback interface of the NvsStreamingContext class and rewrite all the methods in the interface. The implementation code is as follows:
        public class MainActivity extends AppCompatActivity implements NvsStreamingContext.CaptureDeviceCallback {
                            //Please rewrite all methods by yourself
        }
class of NvsStreamingContext 3.1.2 The class of NvsStreamingContext
NvsStreamingContext is the streaming context class of the Meishe SDK, which can be regarded as the entrance to the entire SDK framework. When you start using the Meishe SDK, you need to initialize the NvsStreamingContext class first, and then Get the NvsStreamingContext object and use it elsewhere. NvsStreamingContext is a singleton class,please destroy the NvsStreamingContext class object when use the Meishe SDK no longer or the program exit. Please make sure that don't destroy the NvsStreamingContext object in the middle. The second parameter of init() in the NvsStreamingContext class is the path of the authorization file. If there is no authorization file, the empty string is given.
The codes of NvsStreamingContext initialization are as follow::
                    @Override
                    protected void onCreate(Bundle savedInstanceState) {
                            super.onCreate(savedInstanceState);
                            m_streamingContext = NvsStreamingContext.init(this, null);//初始化Streaming Context
                            setContentView(R.layout.activity_main);
                    }
Destroy the NvsStreamingContext object:
                    @Override
                    protected void onDestroy() {
                            //Destroy the streamingContext object
                            m_streamingContext = null;
                            NvsStreamingContext.close();
                    }
class of NvsStreamingContext 3.1.2 The class of NvsStreamingContext
The NvsLiveWindow control is required to use in the xml file of the recording interface that is used to preview when recording or editing. The xml file is set as follows:
                    <com.meicam.sdk.NvsLiveWindow
                            android:layout_height="match_parent"
                            android:id="@+id/liveWindow"
                            android:layout_width="match_parent"
                    />
The aspect ratio of NvsLiveWindow should be 1:1, 4:3, 16:9, 9:16, etc. It is best to match the parameter of "aspectRatio" for the API of startCapturePreview:videoResGrade:flags:aspectRatio:. Otherwise, the previewed image is the image which trims the video that has finished recording.
NvsLiveWindow fill mode:
                    public class NvsLiveWindow extends SurfaceView implements SurfaceHolder.Callback
                    {
                            //The image is evenly filled and trimed if necessary (default mode)
                            public static final int FILLMODE_PRESERVEASPECTCROP = 0;

                            //The image is evenly scaled to fit the window, no triming
                            public static final int FILLMODE_PRESERVEASPECTFIT = 1;

                            //The image is scaled to fit the window
                            public static final int FILLMODE_STRETCH = 2;
                    }
For the three fill modes, images are shown as below::
- The mode of FILLMODE_PRESERVEASPECTCROP:

- The mode of FILLMODE_PRESERVEASPECTFIT:

- The mode of FILLMODE_STRETCH:

Another way of previewing is to connect to SurfaceTexture and preview on SurfaceView. The interface is as follows:
                    //Connect the timeline to a SurfaceTexture object, the rendering results of the timeline will be output to the SurfaceTexture object.
        public boolean connectTimelineWithSurfaceTexture(NvsTimeline timeline, SurfaceTexture outputSurfaceTexture)

                    //Connect the timeline to a SurfaceTexture object and set the proxy level. The rendering result of the timeline will be output to the SurfaceTexture object.
        public boolean connectTimelineWithSurfaceTexture(NvsTimeline timeline, SurfaceTexture outputSurfaceTexture, NvsRational proxyScale)
before previewing 3.1.4 Preparation before previewing
                    //Set the Callback for NvsStreamingContext (Users must set!!!).
        m_streamingContext.setCaptureDeviceCallback(this);
        if (m_streamingContext.getCaptureDeviceCount() == 0)
            return;
                    //Connect the capture preview to the NvsLiveWindow control(Users must set!!!).
        if (!m_streamingContext.connectCapturePreviewWithLiveWindow(m_liveWindow)) {
            Log.e(TAG, "Failed to connect capture preview with livewindow!");
            return;
        }
                    //Determine that the count of acquisition devices.
                    //If the count of the acquisition device is 1, the front camera cannot be turned on.
        if (m_streamingContext.getCaptureDeviceCount() > 1)
            m_switchBackFacing.setEnabled(true);

                    //Determine if it's a back face device
                    if (m_streamingContext.isCaptureDeviceBackFacing(0))
        {
            .....
        }
preview 3.1.5 Starting preview
The capture preview of video is required before users start recording video.The codes are as follow:
                    //Start acquisition preview
                    m_aspectRatio.den = 1;
                    m_aspectRatio.num = 1;
        m_streamingContext.startCapturePreview(m_currentDeviceIndex, NvsStreamingContext.VIDEO_CAPTURE_RESOLUTION_GRADE_SUPER_HIGH, 0, m_aspectRatio);
3.1 Recording
When capturing the preview, users can see the added beauty and filters on the image of previewing. If you turn on with special effects recording, the recorded file will have a beauty and filter. If not, the recorded video file has no beauty and filter effects,users can add the beauty and filters in the subsequent editing functions. With special effects recording, you must set the value which the parameter of "flags" for startCapturePreview() to NvsStreamingContext.STREAMING_ENGINE_CAPTURE_FLAG_DONT_USE_SYSTEM_RECORDER, otherwise set to 0.
For more information, please refer to: https://www.meishesdk.com/android/doc_ch/html/content/videoRecorderMode_8md.html
3.1 Recording
The output file of recording is .mov or .mp4. startRecording() turns on recording, and stopRecording() stops recording. The parameter of "outputFilePath" for startRecording() is the path to the recorded video file. m_streamingContext.startRecording(file.getAbsolutePath()); m_streamingContext.stopRecording();
3.1 Recording
Set whether the flash is on:
m_streamingContext.toggleFlash(true);
Auto focus:
m_streamingContext.startAutoFocus(new RectF(50,50,100,100));
Set the exposure compensation:
m_streamingContext.setExposureCompensation(40);
Set value of zooming:
m_streamingContext.setZoom(0.8);
3.1.8 Beauty
After adding a beauty effect, you can see the beauty effect in the preview window. When recording a video, the user needs to choose to record with a beauty or not according to the performance of the mobile phone. Beauty effects can be set with strength, whitening, reddening, basic beauty effects, the Intensity of basic beauty effects, sharpening. For specific beauty effects, please refer to the module of "Video Capture" in the "SdkDemo".
The code is as follows:
                    NvsCaptureVideoFx beautyFx = m_streamingContext.appendBeautyCaptureVideoFx();//add beauty effects
                    beautyFx.setFloatVal("Strength", 0.5);//Set the value of "Strength"
                    beautyFx.setFloatVal("Whitening", 0.5);//Set the value of "Whitening"
                    beautyFx.setFloatVal("Reddening", 0.5);//Set the value of "Reddening"
                    beautyFx.setBooleanVal("Default Beauty Enabled", true);//Set the value of "Default Beauty Enabled"
                    beautyFx.setBooleanVal("Default Sharpen Enabled", true);//Set the value of "Default Sharpen Enabled"
                    beautyFx.setFloatVal("Default Intensity", 0.5);//Set the value of "Default Intensity"
effects with recording 3.1.9 Special effects with recording
There are two types of captured effects: built-in captured effects and extended package effects which can obtain through resource package installation.
effects for recording 3.1.9.1 Built-in effects for recording
if you want to get the name of the built-in captured effect,please refer to the list: https://www.meishesdk.com/android/doc_ch/html/content/FxNameList_8md.html。
Add and remove effects:
        m_streamingContext.appendBuiltinCaptureVideoFx(fxName);
        m_streamingContext.removeAllCaptureVideoFx();
package effects for recording 3.1.9.2 Extended package effects for recording
When using the extended package effect, users need to install firstly the resource package and get the resource package ID, and then add the extended package effect. For example, the resource package here is installed in a synchronous method, if the resource package size is too large or it's based on needs, an asynchronous installation can be used.
        String package1Path = "assets:/7FFCF99A-5336-4464-BACD-9D32D5D2DC5E.videofx";
        m_fxPackageId = new StringBuilder();
        int error = m_streamingContext.getAssetPackageManager().installAssetPackage(package1Path, null, NvsAssetPackageManager.ASSET_PACKAGE_TYPE_VIDEOFX, true, m_fxPackageId);
        if (error != NvsAssetPackageManager.ASSET_PACKAGE_MANAGER_ERROR_NO_ERROR
                && error != NvsAssetPackageManager.ASSET_PACKAGE_MANAGER_ERROR_ALREADY_INSTALLED) {
            Log.e(TAG, "Failed to install asset package!");
        }

                    //append video effect
        m_streamingContext.appendPackagedCaptureVideoFx(m_fxPackageId.toString());
3.2 Editing
General steps to implement video editing:
- Initialize firstlt the class of "NvsStreamingContext".If it has already been initialized, the object can be directly obtained.
m_streamingContext = NvsStreamingContext.getInstance();
- Create a timeline. Users can create a timeline by the object of "NvsStreamingContext". If necessary, multiple timelines can be created in one program. Generally,the advice is that it's enough to create a timeline.
- Add tracks, including the video track and audio tracks. Users can add both video tracks and audio tracks to the timeline. After video track is added, user can add the video clips onto the video track, and audio clips onto audio track. If user wants to implement a picture-in-picture, two video tracks are required. The audio track is generally used to adding audio or dubbing to the video track.
- Add the video and audio clips onto the track. Multiple video clips can be added to the video track, which can be video files or pictures, and finally realize the Hybrid editing for the video and image. Multiple music files can also be added to the audio track.
the timeline and set the video resolution 3.2.1 Create the timeline and set the video resolution
Creating a timeline is critical for editing. The video resolution of the timeline determines the maximum resolution (size) when compiling the video file. Please match the resolution of the timeline with the aspect ratio of NvsLiveWindow.
        NvsVideoResolution videoEditRes = new NvsVideoResolution();
                    videoEditRes.imageWidth = 1280; //video resolution width
                    videoEditRes.imageHeight = 720; //video resolution hight
                    videoEditRes.imagePAR = new NvsRational(1, 1); //pixel ratio, set to 1:1
                    NvsRational videoFps = new NvsRational(25, 1); //frame rate, users can set 25 or 30, generally 25.

        NvsAudioResolution audioEditRes = new NvsAudioResolution();
                    audioEditRes.sampleRate = 44100; //audio sampling rate, users can set 48000 or 44100
                    audioEditRes.channelCount = 2; //count of audio channels
Create a timeline:
m_timeline = m_streamingContext.createTimeline(videoEditRes, videoFps, audioEditRes);
Connect the timeline to the NvsLiveWindow control to preview images on the timeline:
        m_streamingContext.connectTimelineWithLiveWindow(m_timeline,m_liveWindow);
                    m_streamingContext.setCompileCallback(this);//set the callback interface of compiling
                    m_streamingContext.setPlaybackCallback(this);//set the callback interface of playback
editing for the multi-segment video and image 3.2.2 Hybrid editing for the multi-segment video and image
In general, create a video track and then add images or videos onto the track. The materials added to the track, we call them the clips. Both image and video clips are added to the track via the file path. Please note: If the image size is too large, you need to reduce the size of the image. The size of the reduced image had better matching the size of the resolution that creates the timeline.
Append video track:
m_videoTrack = m_timeline.appendVideoTrack();
Append audio track:
m_audioTrack = m_timeline.appendAudioTrack();
Append a clip:
                    for(int i = 0; i < pathList.size(); i++) {
                            NvsVideoClip clip = m_videoTrack.appendClip(pathList.get(i));
                    }
and seeking 3.2.3 Playback and seeking
For the interface of playback and seeking, the parameter of "videoSizeMode" is recommended to be set to "NvsStreamingContext.VIDEO_PREVIEW_SIZEMODE_LIVEWINDOW_SIZE". If there is no special requirement, the mode that set to "NvsStreamingContext.VIDEO_PREVIEW_SIZEMODE_FULLSIZE" will affect performance. and "preload" is preloaded and set to YES. Note: The time unit of the Meishe SDK is microseconds, 1/1000000 seconds.
Video playback, the parameter of "endTime" for playbackTimeline() can be set _timeline.duration or -1.
m_streamingContext.playbackTimeline(m_timeline, m_streamingContext.getTimelineCurrentPosition(m_timeline), -1, NvsStreamingContext.VIDEO_PREVIEW_SIZEMODE_LIVEWINDOW_SIZE, true, 0);
Video seeking:
m_streamingContext.seekTimeline(m_timeline, 0, NvsStreamingContext.VIDEO_PREVIEW_SIZEMODE_LIVEWINDOW_SIZE, 0);
triming 3.2.4 Video triming
Change the in and point points of the clip so that trim the clip.
        NvsVideoClip clip = m_videoTrack.getClipByIndex(m_currentPosition);
        clip.changeTrimInPoint((long)trim_in, true);
        clip.changeTrimOutPoint((long)trim_out, true);
the clip on the track 3.2.5 Remove the clip on the track
Remove the clip:
m_videoTrack.removeClip(0, false);
of the video clip 3.2.6 Sorting of the video clip
The clips on the track can be interchanged, and the parameters of "clipIndex" and "destClipIndex" for moveClip() represent the index of the two materials that are interchanged, respectively.
m_videoTrack.moveClip(0,3);
the duration for image 3.2.7 Define the duration for image
The NvsVideoTrack class provides appendClip(String filePath, long trimIn, long trimOut) that You can freely set the duration of the image on the track as needed. the parameter of "filePath" for appendClip:trimIn:trimOut: is the path of the picture material, "trimIn" is set to 0, and "trimOut" is set to 8000000,the result is that the picture display as 8 seconds.
m_videoTrack.appendClip(pathList.get(i),0,8000000);
If the image is added by appendClip(String filePath), the default display time of the image is 4 seconds.
the clip on the track 3.2.5 Remove the clip on the track
The created timeline, the added video track and audio track are removed if they are no longer needed. The operation is as follows:
Remove the timeline:
m_streamingContext.removeTimeline(m_timeline);
Remove the video track:
m_timeline.removeVideoTrack(0);
Remove the audio track:
m_timeline.removeAudioTrack(0);
implementation 3.3 Audio implementation
Add
Adding music to a video is done by adding audio clips onto the audio track. Once the timeline is created, add an audio track via "appendAudioTrack" and add the music file as an audio clip to the audio track. You can add multiple pieces of music and the music will play continuously.
                    //add an audio track
                    m_audioTrack = m_timeline.appendAudioTrack();
        m_audioTrack.appendClip(pathList.get(i));
triming 3.3.2 Music triming
Music triming is the same as video triming, and it's also trimed by setting the in and out points.
        NvsAudioClip clip = m_audioTrack.getClipByIndex(m_currentPosition);
        clip.changeTrimInPoint((long)trim_in, true);
        clip.changeTrimOutPoint((long)trim_out, true);
Caption
Adding, deleting, and getting captions are all performed on the timeline. You can refer to the caption editing module of the SdkDemo example.
Add
Add the caption and set the duration of the caption which display.
NvsTimelineCaption m_timelineCapion = m_timeline.addCaption("Meishe SDK", 0, m_timeline.getDuration(), null);
Remove the caption and return the next caption object on the timeline. Returns nil if there is no next caption.
NvsTimelineCaption nextCaption = m_timeline.removeCaption(m_timelineCapion);
the caption from timeline 3.4.2 Get the caption from timeline
There are several ways to get captions:
                    //Get the first caption on the timeline
                    NvsTimelineCaption firstCaption = m_timeline.getFirstCaption();

                    //Get the last caption on the timeline
                    NvsTimelineCaption lastCaption = m_timeline.getLastCaption();

                    //Get the previous caption of the current caption on the timeline
                    NvsTimelineCaption prevCaption = m_timeline.getPrevCaption(currentCaption);

                    //Get the next caption of the current caption on the timeline
                    NvsTimelineCaption lastCaption = m_timeline.getNextCaption(currentCaption);
Get The captions according to the position on the timeline, and the List collection of the captions of the current position is returned. The sorting rules for the obtained caption list are as follows:
1.When adding, if the in points of captions are different, they are arranged in the order of the in points;
2.When adding, if the in points of captions are the same, they are arranged in the order of adding captions.
List<NvsTimelineCaption> cpationList = m_timeline.getCaptionsByTimelinePosition(1000000);
properties of caption 3.4.3 Modify properties of caption
Modifying the caption properties can be done by the methods of NvsTimelineCaption class. After getting captions, you can set the caption text, color, bold, italic, stroke, etc.
Take the example of modifying the caption text:
currentCaption.setText("Meishe SDK");
If it's a panorama caption, you can also set the polar angle of the caption center point, the azimuth of the caption center point, and so on. Take the polar angle of the center point of the caption as an example:
currentCaption.setCenterPolarAngle(1.2);
properties of caption 3.4.3 Modify properties of caption
After captions are acquired, you can modify the in points, out points, and offset values of the captions on the timeline.
                    //change the in point
                    currentCaption.changeInPoint(1000000);

                    //change the out point
                    currentCaption.changeOutPoint(5000000);

                    //Change the display position (the in and out points move the value of "offset" at the same time)
                    currentCaption.movePosition(1000000);
sticker 3.5 Animated sticker
Adding, deleting, and getting animated stickers are also performed on the timeline. See the sticker module of "SdkDemo" demo.
Add
Add an animated sticker:
m_timeline.addAnimatedSticker(0, m_timeline.getDuration(), m_stickerId.toString());
Remove the animated sticker and return to the next sticker of the current sticker. If there is no next sticker, return null.
NvsTimelineAnimatedSticker nextSticker = m_timeline.removeAnimatedSticker(currentSticker);
the caption from timeline 3.4.2 Get the caption from timeline
There are several ways to get the animated stickers which added on the timeline.
                    //Get the first animated sticker on the timeline
                    NvsTimelineAnimatedSticker firstSticker = m_timeline.getFirstAnimatedSticker();
                    //Get the last animated sticker on the timeline
                    NvsTimelineAnimatedSticker lastSticker = m_timeline.getLastAnimatedSticker();
                    //Get the previous animated sticker of the current animated sticker on the timeline
                    NvsTimelineAnimatedSticker prevSticker = m_timeline.getPrevAnimatedSticker(currentSticker);
                    //Get the next animated sticker of the current animated sticker on the timeline
                    NvsTimelineAnimatedSticker nextSticker = m_timeline.getNextAnimatedSticker(currentSticker);
Get the animated stickers based on the position on the timeline and return the List collection that holds animated sticker object in the current position. The sorting rules for the obtained animated sticker list are as follows:
1.When adding, the in points are different,the animated stickers are arranged in the order of the in points;
2.When adding, the in points are the same, the animation stickers are arranged in the order which added.
List<NvsTimelineAnimatedSticker> stickerList = m_timeline.getAnimatedStickersByTimelinePosition(1000000);
properties of caption 3.4.3 Modify properties of caption
Modifying the sticker properties can be done by the method of NvsTimelineAnimatedSticker class. After getting the sticker, you can set the zoom value, horizontal flip, rotation angle, translation and so on.
Take the modified sticker scale as an example:
currentSticker.setScale(1.2);
If it's a panorama animation sticker, you can also set the polar angle of the center point for the sticker, the azimuth angle of the center point for the sticker, and so on. Take the polar angle of the center point as an example:
currentSticker.setCenterPolarAngle(1.2);
properties of caption 3.4.3 Modify properties of caption
After getting the sticker, you can modify the in point, out point and offset value of the animated sticker on the timeline.
                    //Change in point
                    [currentSticker changeInPoint:1000000];
                    //Change out point
                    [currentSticker changeOutPoint:5000000];
                    //Change the display position (in and out points move the value of "offset" at the same time)
                    [currentSticker movePosition:1000000];
Theme
When editing a video, if you need to apply a theme, you can add and remove it through the timeline.
Add
Apply a theme: m_timeline.applyTheme(m_themeId.toString());
Remove the current theme:
m_timeline.removeCurrentTheme();
the caption from timeline 3.4.2 Get the caption from timeline
Get the package Id of current theme:
m_timeline.getCurrentThemeId();
properties of caption 3.4.3 Modify properties of caption
After applying the theme, you can set the theme title, trailer, theme music volume, etc. Take to set the theme title as an example:
m_timeline.setThemeTitleCaptionText("Meishe SDK");
3.7 Transition
Transitions include video transitions and audio transitions. Video transitions are set on the video track, and audio transitions are set on the audio track.
Video transitions include built-in transitions and package transitions. Here,set the video built-in transitions:
m_videoTrack.setBuiltinTransition(0,transitionName);
Video package transition:
m_videoTrack.setPackagedTransition(1,m_transitionId.toString());
Similarly, the audio transition is the same usage as the video transition, and the user can refer to it.
effects with recording 3.1.9 Special effects with recording
In video follow-up editing, several effects are often used, namely video effects (NvsVideoFx), audio effects (NvsAudioFx), and timeline video effects (NvsTimelineVideoFx).
triming 3.2.4 Video triming
Video effects are used on video clips, and each video clip can add several video effects. Video effects include built-in video effects, package video effects, and beauty effects.
Add a built-in video effect:
videoClip.appendBuiltinFx(fxName);
Add a package video effect:
videoClip.appendPackagedFx(m_fxPackageId.toString());//添加包裹特效
Add a beauty video effect:
videoClip.appendBeautyFx();
Removing the video effect includes removing the specified index of effect and removing all video effects.
Remove the specified index of vedio effect:
videoClip.removeFx(0);
Remove all video effects:
videoClip.removeAllFx();
implementation 3.3 Audio implementation
Audio effects are used on audio clips, and each audio clip can add several audio effects.
Add an audio effect:
audioClip.appendFx(fxName);
Remove the specified index of audio effects:
audioClip.removeFx(0);
Timeline
Timeline video effects are an effect that is used on the timeline, including built-in effects and package effects. Several timeline video effects can be added to the timeline.
Add
Add timeline effects:
                    m_timeline.addBuiltinTimelineVideoFx(1000000,5000000,fxName);
                    m_timeline.addPackagedTimelineVideoFx(1000000,5000000,fxPackageId);
the caption from timeline 3.4.2 Get the caption from timeline
There are several ways to get timeline effects.
                    //Get the first timeline video effect on the timeline
                    NvsTimelineVideoFx firstTimelineFx = m_timeline.getFirstTimelineVideoFx();
                    //Get the last timeline video effect on the timeline
                    NvsTimelineVideoFx lastTimelineFx = m_timeline.getLastTimelineVideoFx();
                    //Get the previous timeline video effect of the current timeline video effect on the timeline
                    NvsTimelineVideoFx prevTimelineFx = m_timeline.getPrevTimelineVideoFx(currentTimelineFx);
                    //Get the next timeline video effect of the current timeline video effect on the timeline
                     NvsTimelineVideoFx nextTimelineFx = m_timeline.getNextTimelineVideoFx(currentTimelineFx);
Gets the timeline video effects based on the position on the timeline, returning an array of video effects objects in current position of timeline. The ordering rules for the obtained timeline video effects array are as follows:
1.When adding, the in points of the timeline video effects are different, they are arranged in the order of the in points;
2.When adding, the in points of the timeline video effects are the same, they are arranged in the order of adding timeline video effects.
List<NvsTimelineVideoFx> timelineFxArray = m_timeline.getTimelineVideoFxByTimelinePosition(2000000);
properties of caption 3.4.3 Modify properties of caption
After you get the timeline effects, you can modify the in points, out points, and offset values of the timeline effects on the timeline.
                    //Change in point
                    currentTimelineFx.changeInPoint(1000000);
                    //Change out point
                    currentTimelineFx.changeOutPoint(5000000);
                    //Change the display position (in and out points move the value of "offset" at the same time)
                    currentTimelineFx.movePosition(1000000);
3.9 Compiling
The Meishe SDK uses compileTimeline:startTime:endTime:outputFilePath:videoResolutionGrade:videoBitrateGrade:flags: to compile a new video from the clip on the timeline.
Compiling video:
        m_streamingContext.compileTimeline(m_timeline, 0, m_timeline.getDuration(),
            m_compilePath, NvsStreamingContext.COMPILE_VIDEO_RESOLUTION_GRADE_720, NvsStreamingContext.COMPILE_BITRATE_GRADE_HIGH, 0);
package management 3.10 Asset package management
The Meihshe SDK provides a rich library of Assets, including animated stickers, themes, caption styles, transitions, and more. The package can be downloaded from the web or provided by the Meishe SDK project team, and users can choose to use these packages as needed. The Meishe SDK manages these Asset packages through the NvsAssetPackageManager class, which can installe, upgrade, uninstalle, obtaine the status of the material package, version number, and so on.
Package installation:
                    //Synchronous installation is used here, if the package is too large, asynchronous mode can be
        int error = m_streamingContext.getAssetPackageManager().installAssetPackage(stickerPackagePath, null, NvsAssetPackageManager.ASSET_PACKAGE_TYPE_ANIMATEDSTICKER, true, m_stickerId);
Package upgrade:
                    //Synchronous installation is used here, if the package is too large, asynchronous mode can be used.
        int error = m_streamingContext.getAssetPackageManager().upgradeAssetPackage(stickerPackagePath, null, NvsAssetPackageManager.ASSET_PACKAGE_TYPE_ANIMATEDSTICKER, true, m_stickerId);
Package uninstallation:
int error = m_streamingContext.getAssetPackageManager().uninstallAssetPackage(m_stickerId,NvsAssetPackageManager.ASSET_PACKAGE_TYPE_ANIMATEDSTICKER);
3.11 Callback
The Meihse SDK provides a lot of delegate interfaces. If you want to query the status of the captured device, the recording status, video playback status, file compilation status, resource package installation status, etc., you must set the delegate and implement the corresponding delegate interface after creating the NvsStreamingContext object.
Take the video playback callback as an example:
m_streamingContext.setPlaybackCallback(this);
4 Appendix
The Meishe SDK version includes the speed version, the standard function version, and the full-featured PRO version. For the function points of each version, please refer to: https://www.meishesdk.com/editsdk, there will be a detailed introduction. Each user can choose to use according to their individual needs and please contact us for details.