A simple guide to Meishe streaming SDK
This is a very simple guide to Meishe streaming SDK aimed to help developers to understand the basic concepts of video editing/capturing and visual effects Meishe SDK can handle, We will also describe the basic steps to complete a common video editing/capturing task using Meishe streaming SDK.
Meishe streaming SDK is a versatile video/audio processing SDK to help users to build their video content creation applications, including video capturing, video editing, visual effect and more. It currently works under Android 4.1+ and iOS 8.0+ (We also have Windows and macOS version, but not released as a product). Meishe streaming SDK implements nearly the same API for both Android and iOS, they differ only in language, one in JAVA and one in objective-C. For video editing, Meishe streaming SDK uses an architecture which is much like NLE(non-linear video editing) system, user can create a timeline with any number of video track/video clips and can modify them at any time without any pre-process to the original media files. For video capturing, Meishe streaming SDK will handle all the dirty work for developers and let them concentrate on the content they are capturing.
This guide will first introduce the basic concept of video editing and steps to call the API; Then we will cover video capturing.
1、Video editing
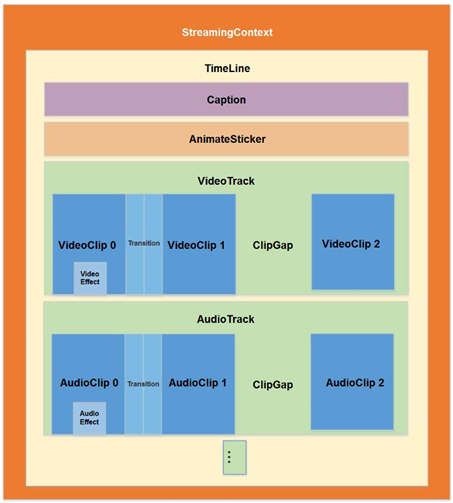
To edit video and audio files by Meishe streaming SDK you must create a timeline to describe what to do with the media files. A timeline is a data structure to let developers tell the streaming engine how to process the media files. It is composed of any number of video tracks and audio tracks, each track can contain a sequence of video/audio clips. You can add video transition effects between two adjacent clips and can add unlimited video/audio filter effects in video/audio clip. Timeline video FX,animated sticker and caption can also be added in the timeline level.
The following graph demonstrate the structure of a timeline.

One can create any number of timelines at a time. If you want to create a timeline you can do it with the following code snippet:
NvsStreamingContext streamingCtx = NvsStreamingContext.init(ctx, null, 0);
NvsVideoResolution videoEditRes = new NvsVideoResolution();
videoEditRes.imageWidth = 1280;
videoEditRes.imageHeight = 720;
videoEditRes.imagePAR = new NvsRational(1, 1);
NvsRational videoFps = new NvsRational(30, 1);
NvsAudioResolution audioEditRes = new NvsAudioResolution();
audioEditRes.sampleRate = 44100;
audioEditRes.channelCount = 2;
NvsTimeline timeline = streamingCtx.createTimeline(videoEditRes, videoFps, audioEditRes);
First of all you must call NvsStreamingContext.init() to initialize the SDK before doing anything with Meishe streaming SDK. The above code creates a timeline with a video dimension of 1280x720, 30 frames per second and the audio sample rate of 44100 and 2 audio channels. The created timeline object will be returned in NvsStreamingContext.createTimeline().
Suppose that you have two video files: /tmp/video1.mp4(duration:10 seconds)and /tmp/video2(duration:5 seconds),you want to add both video files to the timeline and edit them. You can do it as follows:
NvsVideoTrack videoTrack = timeline.appendVideoTrack();
NvsVideoClip videoClip1 = videoTrack.appendClip(“/tmp/video1.mp4”);
NvsVideoClip videoClip2 = videoTrack.appendClip(“/tmp/video2.mp4”);
NOTE: you must create at least one video track in the timeline to hold video clips since timeline can only hold tracks and clips are held in tracks. Now you have added two video clips with the specified media file path in the only video track of the timeline. The first video clip will occupy [0,10s) time interval in the video track and second will occupy [10,15). Now you want to preview the content in the timeline(i.e. the two video clips) then you can do it as follows:
streamingCtx.connectTimelineWithLiveWindow(timeline, liveWindow);
streamingCtx.playbackTimeline(timeline, 0, -1, NvsStreamingContext.VIDEO_PREVIEW_SIZEMODE_LIVEWINDOW_SIZE, true, 0);
NOTE: liveWindow here indicates a created view object of type NvsLiveWindow, it is used to display the timeline output frame. Before using it you must call NvsStreamingContext.connectTimelineWithLiveWindow() to connect a timeline with the live window. After calling NvsStreamingContext.playbackTimeline() the video files in the timeline will be played back and the output video frame will be presented in the live window.
Now suppose you don’t like some contents of the two video files, you just want the first 4 seconds of the first video file and the last 2 seconds of the second video file, then you do it as follows:
videoClip1.changeTrimOutPoint(4000000, true);
videoClip2.changeTrimInPoint(3000000, true);
Now you have done it, if you play back the timeline again you will the observe the change you have made. Note that the above code will finish instantly and will not modify the original physical video file, it just tells the timeline you want to crop the video file and all the work will be done in real-time when you play back the timeline.
Now let me give you a brief introduction of what the function really does. First of all every clip has a trim in and a trim out point, it indicates which part of the media file you want to process in the timeline. For example, when you append /tmp/video1.mp4 at first, its trim in point will be 0, and trim out point will be 10000000 which means you will use the whole file(Please keep that in mind that all the time value used in Meishe streaming SDK will be in microsecond). videoClip1.changeTrimOutPoint(4000000, true); simply changes the trim out point of the first video clip to 4s which means the last 6s is cut out. The second parameter is set to true means the subsequent clips will be moved forward according to this change, if you set the second parameter to false it will leave a 6s hole between the first clip and the second. Then videoClip2.changeTrimInPoint(3000000, true); simply cuts the first 3s of the first video file.
Note that there are many more operations you can do to edit the video/audio clips in the timeline but since this is a simple guide, we will not discuss them here.
Say that you have completed your video editing and you want to generate a final video of the timeline, you can do this by:
streamingCtx.compileTimeline(timeline, 0, timeline.getDuration(), “/tmp/output.mp4”, NvsStreamingContext.COMPILE_VIDEO_RESOLUTION_GRADE_720, NvsStreamingContext.COMPILE_BITRATE_GRADE_HIGH, 0);
By calling compileTimeline() the streaming engine starts to compile the final result of the timeline into a video file specified by you(in this example, /tmp/output.mp4). This call will return immediately after you call it, the compiling is being processed in the internal threads of the streaming engine. You must implement NvsStreamingContext.CompileCallback/NvsStreamingContext.CompileCallback2 interface to listen to the progress/failure/cancellation event of the compiling process.
Suppose that you want more fun with the video you have created, you decide to add a cartoon effect to the first video clip and a color correction to the whole timeline, you can do this as follows:
videoClip1.appendBuiltinFx(“Cartoon”);
NvsTimelineVideoFx lutFx = timline.addBuiltinTimelineVideoFx(0, timeline.getDuration(), “Lut”);
lutFx.setStringVal(“Data File Path, “/tmp/pink-3dlut.mslut”);
Now, the visual effects has been added, you can play back the timeline to see the change. There are many built-in visual effects in Meishe streaming SDK, each one has a set of parameters which you can use to tune the visual effect. Apart from built-in visual effect there are also packaged visual effect which is the real power of Meishe SDK, it gives you unlimited possibility and extensibility to visual effect. We also have custom video FX. But these beyond the scope of this guide.
Now you may want to add a caption to the timeline:
timline.addCaption(“Hello World!”, 1000000, 3000000, null);
A caption has been added to the timeline which start from 1s and last 3s. The last parameter of addCaption() indicate a caption style package which can give more visual impact on your caption, but we will not discuss it here.
You can also add transition effect between clips such as:
videoTrack.setBuiltinTransition(0, “Lens Flare”);
You will see a lens flare effect between the first video clip and the second one. There are also animated stickers but we don’t discuss it here.
You can also add audio clips to an audio track of the timeline, you edit audio clips the same way as you edit video clips. Note that the audio track in a video file will also form a audio track of the timeline but it is invisible to developers (but you can change its volume if you want). You can also add audio effects to audio clips.
The last thing I want to discuss is theme. A theme is package to beautify your timeline automatically. To apply a theme to a timeline you can do this:
timeline.applyTheme(themeId);
After this your timeline has been decorated by the given theme package. Every theme package has its own design, this is the fastest way to beautify your timeline. The theme package is among the several kinds of packaged materials of Meishe SDK provided.
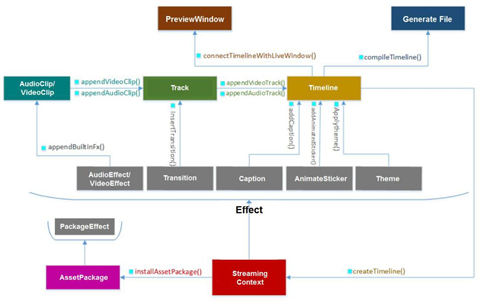
Below is a graph to demonstrate the usage of timeline:

2、Video capturing
Now let’s move to the topic of video capturing. Capture video with Meishe SDK is very easy, to start a camera preview simply do as the following:
streamingCtx.connectCapturePreviewWithLiveWindow(mLiveWindow);
streamingCtx.startCapturePreview(0, NvsStreamingContext.VIDEO_CAPTURE_RESOLUTION_GRADE_HIGH , NvsStreamingContext.STREAMING_ENGINE_CAPTURE_FLAG_DONT_USE_SYSTEM_RECORDER, null));
First, we connect capture preview with a live window object, then we call startCapturePreview() to start capture preview, the captured video frame will be presented in the live window view. The first parameter of startCapturePreview() is the capture device index,
Meishe streaming SDK provides API to query capture device count and facing of each capture device. The second parameter indicates the resolution level of the capture preview. In general NvsStreamingContext.VIDEO_CAPTURE_RESOLUTION_GRADE_HIGH will start a capture preview of 720P in dimension. You can also set some flags in the third parameters but we won’t discuss it here.
There are many operations to control how you can capture a video such as focus, auto exposure, exposure compensation..., but these are beyond the scope of this guide.
You may want to add a visual effect for video capturing, do it as follows:
NvsStreamingContext.appendBuiltinCaptureVideoFx(“Beauty”);
This will add a face beautification built-in effect to video capturing. Note that all the visual effects available for video editing also apply to video capturing. You can also add face related stickers to video capturing.
To record the captured video frames to a file:
streamingCtx.startRecording(“/tmp/record.mp4”);
This will start video recording and save video frames to the specified media file. You can call stopRecording (NvsStreamingContext) to finish video recording. You can call startRecording()/stopRecording() multiple times to record several video files. It is also possible to record several interval into a single media file.
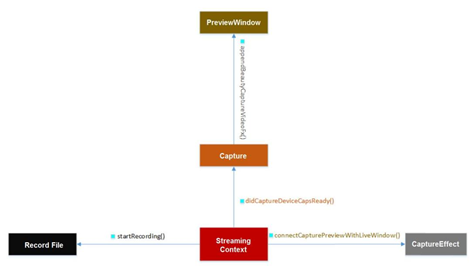
Below is a graph to demonstrate video capturing:

3、Epilogue
This is a very simple guide to Meishe streaming SDK. It can do much more than the functions described in this guide. Developers can take the sdk demo project as a starting point. There are also API documents in Meishe SDK website: https://www.meishesdk.com
 1.8.18